Random Notes on Coding
Some C++
C++ Basics
inline 关键字
允许重复定义 (如果你要在头文件里定义 (而不是声明) 函数最好加上
inline):add.cpp
inline int add(int a, int b) {return a + b;}避免函数调用开销, 如果
add()用 Listing lst-addcpp 来定义, 则:int x = add(3, 5);会被编译器展开成:
int x = 3 + 5;(当然这个函数由于过于简单, 如果不用
inline, 编译器也会自动优化掉函数调用开销).
extern 关键字
告诉编译器这变量存在, 先不要急着报错, 链接的时候会找到它.
// var.cpp
int var = 2;

// main.cpp
#include <iostream>
extern int var;  // Tell compiler var exists somewhere
int main() {
    std::cout << "var = " << var << std::endl;
    return 0;
}
g++ main.cpp var.cpp -o main ./main # Outputs: var = 2extern "C": 当用 Cpp 写的函数名要被 C 代码 (或汇编) 调用时需要加上extern "C"来告诉编译器不要对函数名进行 Name mangling (名字修饰).- Name mangling: 在 Cpp 中编译出来的
.o文件中的函数名并不是源代码中写的名字 (但是 C 语言中是一样的)! 比如下面的例子:
- Name mangling: 在 Cpp 中编译出来的
a.c
#include <stdio.h>
int my_add(int, int);
int main() {
    int result = my_add(3, 5);
    printf("Result: %d\n", result);
    return 0;
}
不用 extern "C" 时:
b.cc
int my_add(int x, int y) {return x + y;}
gcc -c a.c -o a.o
g++ -c b.cc -o b.o
nm a.o  # 查看符号表
nm b.o
g++ a.o b.o -o program # Linking error!
输出:
# C 语言的函数名没有变化
0000000000000000 T main
                 U my_add
                 U printf
# b.o 里的函数名被改成了 _Z6my_addii
0000000000000000 T _Z6my_addii
# linking error
/bin/ld: a.o: in function `main':
a.c:(.text+0x15): undefined reference to `my_add'
collect2: error: ld returned 1 exit status
使用 extern "C" 时:
b.cc
extern "C" {
int my_add(int x, int y) {return x + y;}
}
gcc -c a.c -o a.o
g++ -c b.cc -o b.o
nm a.o # 查看符号表
nm b.o
g++ a.o b.o -o program
./program输出:
# C 语言的函数名没有变化
0000000000000000 T main
                 U my_add
                 U printf
# b.o 里的函数名也没有变化
0000000000000000 my_add
# ./program 执行结果
Result: 8
命令行参数
argc: Argument Count, 参数个数argv: Argument Vector, 参数列表 (字符串数组)
int main(int argc, char* argv[]) {
    return 0;
}
编译运行:
g++ main.cpp -o main
./main abc 999 test
会有:
argc = 4
argv[0] = "./main"
argv[1] = "abc"
argv[2] = "999"
argv[3] = "test"
类型转换
TODO
Memory Management 内存管理
Type 数据类型
size_t: 就是unsigned int(RV32 就是 \(32\) bit). 一般用来表示内存大小或数组索引.
new 关键字
new 用来在堆上分配内存:
int* p = new int[10]; // Allocate 10 integers on heap
for (int i = 0; i < 10; i++) {
    p[i] = i * i; // Assign values
}
delete[] p; // Don't forget to free the memory!
分配单个对象. 注意下面两行代码的唯一区别是 malloc 没有调用 Constructor!
MyClass* obj = new MyClass(); // Allocate single object
MyClass* obj2 = (MyClass*)malloc(sizeof(MyClass)); // C-style allocation
delete obj; // Free the memory!
free(obj2); // Free C-style allocated memory
Smart Pointers 智能指针
Smart Pointers =
newwithoutdelete. 即不需要担心内存泄漏问题.
std::unique_ptr<T>: 不能被复制:std::unique_ptr<int> p1 = std::make_unique<int>(42); // 在堆上分配一个 int, 初始化为 42, 并将其地址赋给智能指针 p1 // std::unique_ptr<int> p2 = p1; // Error: cannot copy unique_ptrstd::shared_ptr<T>: 可以被复制 (用过引用计数来管理内存).
copy_sharedptr.cc
copy_wildptr.cc
#include <iostream>
using namespace std;

int* g;

void store(int* p) {
    g = p;
}

int main() {
    {
        int x = 23;
        store(&x);
    }// x 生命周期结束
    // g 变成野指针
    cout << *g << endl;// 未定义
}
std::weak_ptr<T>: 不会增加引用计数, 用于解决shared_ptr循环引用问题 (Figure fig-cirref,a1表示a的引用计数为 1 (a.use_count() == 1)):

sharedptr.cpp
weakptr.cpp
#include <memory>
#include <iostream>

class B; // Let A know B

class A {
public:
    std::weak_ptr<B> bptr;
    ~A() {
        std::cout << "A destroyed\n";
    }
};

class B {
public:
    std::weak_ptr<A> aptr;
    ~B() {
        std::cout << "B destroyed\n";
    }
};

int main() {
    auto a = std::make_shared<A>(); // a1
    auto b = std::make_shared<B>(); // b1

    a->bptr = b; // b1 still
    b->aptr = a; // a1 still

    // Destroy properly
} // a0 b0
Arena 分配器
TODO
Class 类
Constructor, Init List 构造函数与初始化列表
Constructor 构造函数: 相当于
Python里的__init__方法. 每次创建对象时会被调用.可以有多个 Constructor (根据初始化时所带参数数量和类型自动调用, 也是多态的一种体现). 名字必须直接用类名:
ClassName().- 也支持 Default Arguments 默认参数:
ClassName(int w = 1)意思是如果创建对象时没传参数w就等于1.
- 也支持 Default Arguments 默认参数:
如果没写则编译器默认会生成一个效果跟下面一样的构造函数:
ClassName() {} // Default constructor
// Or
ClassName() = default;
建议显式写出默认构造函数, 以防止别人以为你忘了写.
Destructor 析构函数: 相当于
Python里的__del__方法. 每次对象被销毁时会被调用. 名字是~ClassName().Constructor member initializer list: 用于在 Constructor 体执行前初始化成员变量 (用
:引出). 那跟放在 Constructor 体里初始化有什么区别呢?C++规定: 所有成员对象, 必须在进入构造函数体之前完成构造, 比如 #lst-constructorcpp 中进入Big(int in) {...}之前就必须构造出small, 那只能调用Small的默认构造方法Small(). 所以1先被打印.
constructor.cpp
#include <iostream>
using namespace std;

class Small
{
public:
    Small()
    {
        cout << 1 << endl;
    }

    Small(int in)
    {
        cout << 2 << endl;
    }
};

class Big
{
private:
    Small small;
public:
    Big(int in)
    {
        small = Small(in);
        cout << 3 << endl;
    }
};

int main()
{
    Big big(7); // Output: 1 2 3
    return 0;
}
constructor_init.cpp
#include <iostream>
using namespace std;

class Small
{
public:
    Small()
    {
        cout << 1 << endl;
    }

    Small(int in)
    {
        cout << 2 << endl;
    }
};

class Big
{
private:
    Small small;
public:
    Big(int in)
        : small(in)
    {
        cout << 3 << endl;
    }
};

int main()
{
    Big big(7); // Output: 2 3
    return 0;
}
this 指针
就是 Python 里的 self (当前对象的地址):
class A {
private:
    int x;

public:
    void setX(int x) {
        this->x = x;   // Left: member variable; Right: parameter
    }
};
类继承
- 下面代码表示
class A继承class B(记作 “A is-a B”).public表示公开继承, 即B的public和protected成员在A里依然是public和protected1.
class A : public B
1 protected 和 private 区别: 前者代表本类和子类可以访问, 后者只能本类访问 (子类不行).
friend 关键字
在一个类里面声明另一个类 (或函数) 为 friend, 表示同意它访问自己的 private 和 protected 成员 (注意是谁访问谁的私有成员!):
friend.cpp
#include <iostream>

class B;  // Tell compiler that B exists

class A {
private:
    int secret = 7;

    friend class B; // B is an intimate friend of A
    // friend B;    // Alternative
};

class B {
public:
    void reveal(A& a) {
        std::cout << a.secret << std::endl;
    }
};

int main() {
    A a;
    B b;
    b.reveal(a); // Outputs: 7
    return 0;
}
Alias 别名
Reference 引用
- Reference 仅仅是 Syntax sugar!
- 必须初始化.
int& ref;是错误的. int& ref = a;在编译时不会出现ref这个变量, 它只是a的别名 (alias).
change_val_ref.cpp
#include <iostream>
int main()
{
    int a = 5;
    int& ref = a; // ref is an alias to a
    ref = 10;     // Actually modifies a
    std::cout << "a = " << a << std::endl; // Outputs: a = 10
    return 0;
}
increment_val_ref.cpp
#include <iostream>
void increment(int& num) {num++;}
int main()
{
    int value = 5;
    increment(value); // Pass by reference
    std::cout << "value = " << value << std::endl; // Outputs: value = 6
    return 0;
}
typedef 和 using 关键字
下面两个都是给复杂类型 std::vector<int> 起好听一点的名字 IntList, 效果一样:
using IntList = std::vector<int>;
typedef std::vector<int> IntList;
Polymorphism 多态
多态: 同一个接口用于不同的数据类型. 这是 OOP 的重要特性之一. 分为:
- 编译时多态: 函数重载、运算符重载.
- 运行时多态: 虚函数、纯虚函数.
函数重载
- 如果你需要让很多同名的函数支持不同类型或数量的参数, 可以把他们放进一个 class 里面, 因为 class 支持函数重载:
overload_function.cpp
#include <iostream>

class Print {
public:
    void show(int i) {
        std::cout << "Integer: " << i << std::endl;
    }

    void show(double d) {
        std::cout << "Double: " << d << std::endl;
    }

    void show(const std::string& s) {
        std::cout << "String: " << s << std::endl;
    }
};

int main() {
    Print p;
    p.show(5);          // 输出: Integer: 5
    p.show(3.14);       // 输出: Double: 3.14
    p.show("Hello");    // 输出: String: Hello

    return 0;
}
运算符重载
- 运算符重载使得
+,*这些运算符可以用于自定义 class 之间的运算 (而不仅限于int,float等). Python里面也有__add__这种魔法方法实现重载.- 重载是不好的编程习惯! 但在写 API 的时候要提供重载和非重载两种接口供开发者使用 (比如下面的
Add()和operator+()方法), 定义的时候可以用重载定义非重载, 也可以反过来:
overload_op_calls_method.cpp
class Point
{
public:
    double x, y;

    Point(double x_coor, double y_coor)
        : x(x_coor), y(y_coor) {}

    Point Add(const Point& other) const
    {
        return Point(x + other.x, y + other.y);
    }

    Point operator+(const Point& other) const
    {
        return Add(other);
    }
};
overload_method_calls_op.cpp
class Point
{
public:
    double x, y;

    Point(double x_coor, double y_coor)
        : x(x_coor), y(y_coor) {}

    Point Add(const Point& other) const
    {
        return *this + other;
    }

    Point operator+(const Point& other) const
    {
        return Point(x + other.x, y + other.y);
    }
};
这样就可以直接这样来将两个 Point 对象相加:
overload_main.cpp
#include <iostream>
#include "overload_op_calls_method.cpp"

int main()
{
    Point p1(1.0, 2.0);
    Point p2(3.0, 4.0);

    Point p3 = p1 + p2;  // i.e., p3 = p1.operator+(p2);
    std::cout << "p3: (" << p3.x << ", " << p3.y << ")\n"; // p3: (4, 6)

    return 0;
}
虚函数
- 我们想用同一个函数
print_res()来打印A类和B类 (derived fromA) 各自的forward()结果, 我们在 C++ 和 Python 里实现它们. 发现虽然两种语言print_res()定义时规定参数类型都是A*, Python 就很聪明, 成功调用了各自的forward()方法; 而 C++ 却都用的是A类的forward()方法 (这不是我们所期望的).
virtual.cc
#include <iostream>
using namespace std; // bad habits

class A {
public:
    int forward(int x) const {
        return x;
    }
};

class B : public A {
public:
    int forward(int x) const {
        return 2*x;
    }
};

void print_res(const A* model, int x) {
    cout << model->forward(x) << endl;
}

int main() {
    B* m = new B();
    print_res(m, 3); // 3
    delete m;
}
virtual.py
class A:
    def forward(self, x):
        return x

class B(A):
    def forward(self, x):
        return 2 * x

def print_res(model: A, x: int):
    print(model.forward(x))

if __name__ == "__main__":
    m = B()
    print_res(m, 3)  # 6
为了使得子类的方法能够覆盖 (override) 父类的方法, 我们需要在父类的方法前加上
virtual, 子类的函数体前加上override(也可以不加).class A { public: virtual int forward(int x) const { return x; } }; class B : public A { public: int forward(int x) const override { return 2*x; } };虚函数通过 vtable 实现, 会增加一点点内存和时间开销, 但小到可以忽略.
纯虚函数 (a.k.a. 接口, 抽象类)
- 动机: 有时候我们希望一个类没有一个具体的方法 (只有一个抽象的方法), 很多子类都去实现这个方法. 以 Listing lst-virtualcc 来说的话就是我们希望
A类的forward()方法不要有具体实现, 让所有子类都去实现它. 这样的类叫做 Abstract Class 抽象类, 也叫做 Interface 接口 (很形象吧).- 比如 Listing lst-virtualpurecc 中的
Speaker很抽象吧嘿嘿.
- 比如 Listing lst-virtualpurecc 中的
- 实现: 在父类的方法后面前加上
= 0, 称为一个 Pure Virtual Function 纯虚函数.- 这样的抽象类不能被实例化, 只有子类可以被实例化.
- Listing lst-virtualpurecc 还实现了 Wrappers 包装器, 用于给已有的类添加功能 (如同 Python 装饰器).
virtual_pure.cc
#include <iostream>

class Speaker {
public:
    virtual void speak() = 0; // pure virtual
};

class Dog : public Speaker {
public:
    void speak() override {
        std::cout << "Woof" << std::endl;
    }
};

class Cat : public Speaker {
public:
    void speak() override {
        std::cout << "Nya" << std::endl;
    }
};

class SpeakerWrapper : public Speaker {
private:
    Speaker* speaker_;
public:
    SpeakerWrapper(Speaker* speaker) : speaker_(speaker) {}
    void speak() override {
        std::cout << "Wrapper begins: " << std::endl;
        speaker_->speak();
        std::cout << "Wrapper ends." << std::endl;
    }
};

int main() {
    // 不能实例化抽象类
    // Speaker* sp = new Speaker(); // error!

    // 用子类 Dog 声明 dog
    Dog* dog = new Dog();
    // 用抽象类 Speaker 声明 cat
    Speaker* cat = new Cat();
    // 用 wrapper 包装 cat
    Speaker* wrapped_cat = new SpeakerWrapper(cat);

    dog->speak(); // Woof
    cat->speak(); // Nya
    wrapped_cat->speak(); // Wrapper begins: Nya Wrapper ends.

    delete dog;
    delete cat; // Warning! 因为抽象类的析构函数不是虚函数
    delete wrapped_cat; // Warning! 同上
}
但是 Listing lst-virtualpurecc 会有个 warning:
virtual_pure.cc:34:5: warning: delete called on 'Speaker' that is abstract but has non-virtual destructor [-Wdelete-abstract-non-virtual-dtor]
34 |     delete cat;
   |     ^
这是因为
delete一个Speaker类型的指针时, 会去调用Speaker抽象类的析构函数 (注意这个析构函数是被隐式创建过的), 这时候编译器非常贴心的提醒我们: 你应该想调用的是子类的析构函数吧, 你最好把父类的析构函数也声明为virtual:class Speaker { public: virtual ~Speaker() = default; virtual void speak() = 0; // pure virtual };
Namespace 命名空间
- 我们希望在不同的场景中给功能类似的函数起完全相同的名字 (比如下面例子的
print()函数), 为了避免命名冲突, 我们可以使用namespace:
namespace.cpp
#include <iostream>

namespace AppleSpace { namespace GoodApple {
    void print(const char* msg)
    {
        std::cout << "Goodapple " << msg << std::endl;
    }
}   namespace BadApple {
    void print(const char* msg)
    {
        std::cout << "Badapple " << msg << std::endl;
    }
} }

namespace OrangeSpace {
    void print(const char* msg)
    {
        std::cout << "Orange " << msg << std::endl;
    }
}

int main() {
    AppleSpace::GoodApple::print("Hello");
    AppleSpace::BadApple::print("Hello");
    OrangeSpace::print("Hello");
    return 0;
}
输出:
Goodapple Hello
Badapple Hello
Orange Hello
不要到处拉
using namespace xxx;的 shit!全局作用域运算符:
- 所以自己的 namespace 最好避开有可能称为官方 namespace 的名字, 比如
namespace cuda { ... }.
- 所以自己的 namespace 最好避开有可能称为官方 namespace 的名字, 比如
namespace-global.cpp
#include <iostream>

namespace A { int x = 1; }

namespace B {
namespace A { int x = 2; }

void f() {
    std::cout << A::x << std::endl;     // 表示当前命名空间下的 A
}
void g() {
    std::cout << ::A::x << std::endl;   // 表示全局命名空间下的 A
}
}

int main() {
    B::f();     // 输出: 2
    B::g();     // 输出: 1
}
::可用于调用 namespace 里的函数 或 class 里的static变量或方法. 在外部定义类的方法实现时必须用::(调用时用.).
常见库用法
std::copy()
#include <vector>
#include <algorithm>  // std::copy

int main() {
    std::vector<int> src = {1, 2, 3, 4, 5};
    std::vector<int> dst(5);   // Must arrange space in advance

    std::copy(src.begin(), src.end(), dst.begin()); // Copy src to dst
}
Some Python
Python Basics
Python 变量
Mutable 可变类型
Immutable 不可变类型
函数传参时不可变类型按值传递, 可变类型按引用传递 (是这样吗, TODO).
Import Libraries
导入库就是让定义在别的文件中所有 object (函数、类、实例、变量等) 在本文件中可以被使用, 一般有下面几种使用方法:
# cocotb 是文件夹!
# 导入虚拟环境的 /site-packages/cocotb 文件夹下的所有 object (好像不是所有?? TODO)
# 之后要用的 object 必须用 cocotb.xxx 引出
import cocotb

# 这样做可以简化引出方式: np.xxx
import numpy as np

# 只导入 cocotb 文件夹下 triggers.py 的 RisingEdge() 函数
# 这样就可以直接用 RisingEdge() 而不用 cocotb.triggers.RisingEdge()
from cocotb.triggers import RisingEdge

# 导入当前目录 ./helpers/xxx.py 中的一些 object
from .helpers.memory import Memory          # class
from .helpers.format import format_cycle    # function
from .helpers.logger import logger          # instance
async def 和 await
async def表示这个函数的执行过程中如果碰到await关键字, 会暂时跳出这个函数, 先去处理其它的函数, 比如:
async-demo.py
import asyncio
import time

async def task1():
    print("Task 1: Starting")
    await asyncio.sleep(10)
    print("Task 1: Completed")

async def task2():
    print("Task 2: Starting")
    await asyncio.sleep(5)
    print("Task 2: Completed")

async def do_tasks_async():
    start = time.time()

    task1_start = asyncio.create_task(task1())
    task2_start = asyncio.create_task(task2())

    print("Arranged two tasks, waiting for complete ...")
    await task1_start
    await task2_start

    end = time.time()
    print(f"All tasks completed in {end - start:.1f} seconds")

if __name__ == "__main__":
    asyncio.run(do_tasks_async())
输出:
Arranged two tasks, waiting for complete ...
Task 1: Starting
Task 2: Starting
Task 2: Completed
Task 1: Completed
All tasks completed in 10.0 seconds
assert
assert用来 debug 很有用, 比如你要检查程序中间a是否等于1:a = 1 assert a == 1 # 如果 a 不等于 1, 程序会报错退出 print("Test passed!")assert后面接的就是一个布尔值, 所以:assert True # No error assert False # Raises an AssertionError也可以加上错误信息:
assert a == 1, "a is not equal to 1!"
异常控制
try,except,else,finally经典 4 块结构:
def demo(x):
    try:                        # This block could be risky and only
        print("A")
        y = 10 / x
    except ZeroDivisionError:   # Handle specific exception
        print("B")
    else:                       # Runs if no exception occurs
        print("C")
    finally:                    # Always runs
        print("D")

demo(2)         # A C D
print("-----")
demo(0)         # A B D
with+__enter__和__exit__实现资源的自动管理 (上下文管理器):经典的例子:
with open("file.txt", "r") as f:
    data = f.read()
还有:
with torch.no_grad(): ... # 相当于 (假设之前设置过 torch.set_grad_enabled(True)): # torch.set_grad_enabled(False) # ... # torch.set_grad_enabled(True)with后面跟的一定是一个 class 的实例 (可以现创建或用已有的实例), 而且该 class 必须实现__enter__和__exit__方法:
class MyContext:
    def __init__(self):
        print("I")
    def __enter__(self):
        print("A")
        return 1
    def __exit__(self, exc_type, exc_value, traceback):
        print("B")
        return 2

# 输出: I A Hi B
with MyContext():               # 如果你不需要用到 __enter__ 的返回值
    print("Hi")

print("-----")

# 输出: I A 3 1 4 B
with MyContext() as context:    # 如果你需要用到 __enter__ 的返回值
    print(3)
    print(context)
    print(4)

print("-----")

# 输出: I A 1 B
mycontext = MyContext()
with mycontext as context:      # 使用已有的 context 对象
    print(context)
Python Class 类
类属性和实例属性
- Class attribute 类属性: 只不过是定义在类里面的常量而已, 所有实例共享, 比如可用于 track 某个 class 的实例个数.
- 在类的内部和外部都可以用
Car.wheels来访问和修改.
- 在类的内部和外部都可以用
- Instance attribute 实例属性: 在类里面用
self.xxx来定义的属性, 只有创建了实例后才能访问, 不同的实例可以有不同的值 (独有)!- 最好在
__init__里面定义完整! 虽然也可以在后面的方法里面新建新的实例属性 (例子: Listing lst-dunder-method-dict), 但是这种习惯不方便阅读和理解. - 在类的内部用
self.color、外部用car1.color来访问和修改.
- 最好在
class Car:
    # Class attributes
    wheels = 4
    count = 0

    def __init__(self, color, model):
        # Instance attributes
        self.color = color
        self.model = model
        Car.count += 1 # 每创建这样的类时, 计数加 1

print(Car.wheels)  # Accessing class attribute
# print(Car.color) # Cannot access instance attribute without creating instances

car1 = Car("red", "Toyota")
car2 = Car("blue", "Honda")
print(car1.color)

print(Car.count)  # Output: 2
- 实例属性可以动态访问和创建! Surprise!
动态访问实例属性
getattr(): 若访问的属性名在运行时才能决定, 比如:class Order(): def __init__(self): self.price = 100 self.qty = 5 order = Order() attr_name = "price" print(order.attr_name) # 这样是不行的! print(getattr(order, attr_name)) # 这样才行!动态创建实例属性
setattr(): 若创建的属性名在运行时才能决定, 比如:class Order(): def __init__(self): self.price = 100 self.qty = 5 order = Order() attr_name = "discount" setattr(order, attr_name, 0.1) # 给 order 实例创建一个 discount 属性 order.discount = 0.1 # 这样也可以!! print(order.discount) # 输出: 0.1
特殊方法 @classmethod、@staticmethod
@classmethod仅仅是允许我们不创建实例就能调用该方法. 用途:- 如果非要用
car1.change_wheels(6)而不是Car.wheels = 6来修改类属性, 这个时候就可以用@classmethod.- 用
Car.change_wheels(6)也行.
- 用
- 由于该方法可以在创建实例前调用, 所以从某种角度看可以当作替代构造函数的方法 (比如下面从字典和 JSON 创建实例).
- 如果非要用
@staticmethod仅仅是定义一个与类完全无关的函数, 函数里面不能访问任何类属性和实例属性, 写在类里面仅仅是因为逻辑上与该类相关, 一般就是 print 一些信息.- 用实例名也可以调用该方法.
class Car:
    # 常规初始化方法
    def __init__(self, color, model):
        self.color = color
        self.model = model

    # 两个可选的初始化方法
    @classmethod
    def init_from_dict(cls, init_dict): # cls 代表一个类名, 只是约定俗成叫 cls, 可以叫别的名字
        return cls(init_dict['color'], init_dict['model'])

    @classmethod
    def init_from_json(cls, json_str):
        import json
        init_dict = json.loads(json_str) # 将 json 字符串转换为字典
        return cls(init_dict['color'], init_dict['model'])

    # 一个sb降智方法
    @staticmethod
    def car_add_print_numbers(num1, num2):
        print(f"{num1 + num2} cars in total")

car1 = Car("red", "Toyota") # 使用常规初始化方法
car2 = Car.init_from_dict({'color': 'blue', 'model': 'Honda'}) # 使用字典初始化方法
car3 = Car.init_from_json('{"color": "green", "model": "Ford"}') # 使用 json 字符串初始化方法

Car.car_add_print_numbers(3, 5)  # Output: 8 cars in total
car1.car_add_print_numbers(10, 20)  # 用实例访问也行, Output: 30 cars in total
它们其实本质上是一个函数, 可以思考下可能是怎么实现的.
Python 类继承
object类是所有类的基类 (所有类都默认继承自object).- 所以所有的类都可以调用
print()之类的方法, 因为print()最终会调用object类的__str__()方法.
- 所以所有的类都可以调用
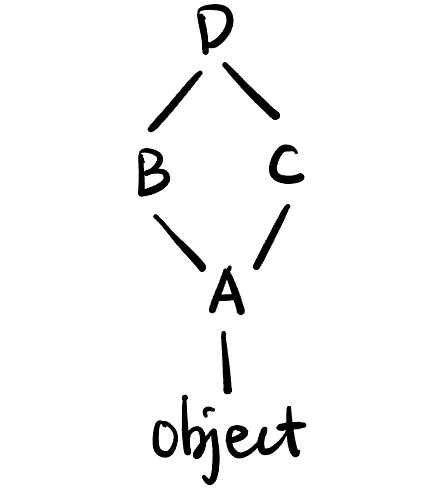
super()用于执行父类的某方法 (仅此而已), 不一定是__init__()方法, 也可以是其它方法.多继承: Python 允许一个类同时继承多个类, 比如 Listing lst-superpy 中定义了 Figure fig-super 的简单多继承结构, 每个类都调用了父类的
foo()方法.- 具体调用顺序由 C3 算法决定 (见 Algorithm Notes 算法笔记).
super.py
class A:
    def foo(self):
        print("A")

class B(A):
    def foo(self):
        print("B")
        super().foo()

class C(A):
    def foo(self):
        print("C")
        super().foo()

class D(B, C):  # 有顺序! B 比 C 更重要一点
    def foo(self):
        print("D")
        super().foo()

print(D.__mro__)
# 输出: (<class '__main__.D'>, <class '__main__.B'>, <class '__main__.C'>, <class '__main__.A'>, <class 'object'>)
D().foo()
# 输出: D B C A
- 有参数的
super():super()不比放在类里面, 也可以放在函数里. 放在类里面时自动替换为super(CurrentClass, self).super(ClassName, instance/cls)表示从ClassName的下一个类的 MRO 开始往后找 (即跳过ClassName)instance/cls中的方法, 比如:
super-para.py
class A:
    def f(self):
        print("A.f")

class B(A):
    def f(self):
        print("B.f")
        super().f()         # Equivalent to call_super(B, self)

class C(B):
    def f(self):
        print("C.f")
        call_super(B, self) # C will skip B and call A.f()

def call_super(after, find_cls):
    super(after, find_cls).f()

c = C()
c.f()                       # Output: C.f A.f
Python 下划线
下划线的基本用法
作为大数字的分隔符 (只是看起来更舒服):
num = 1_000_000 # 相当于 num = 1000000作为不重要的变量, 常见的有:
- 循环变量
for _ in range(5): # 表示循环变量不重要, 不会在循环体内使用 print("Hello")- 解包变量
a, _, b = (1, 2, 3)  # 表示中间的变量不重要
print(a, b)          # 输出: 1 3
用来避免保留关键字 (仅仅是约定, 众所周知程序员很不擅长取名字, 不用
foo就很好了, 理解一下):class_ = "MyClass" # 避免和关键字 class 冲突
Python 下划线命名的可见性
我们研究单下划线、双下划线的 变量、函数、类属性、实例属性、类方法、实例方法、类名 在 类内部、子类、类外同文件、不同文件 中的可见性.
总体来说, 单下划线开头 \(\approx\) “protected”, 双下划线开头 \(=\) “private”.
myModule.py
_var = 5                # module variable
__var = 6               # module variable

def _g():               # module function
    print("_g called")

def __g():              # module function
    print("__g called")

class A:
    _ca = 1             # Class attribute
    __ca = 2            # Class attribute
    def __init__(self):
        self._ia = 3    # Instance attribute
        self.__ia = 4   # Instance attribute
    def _f(self):
        print("_f called")
    def __f(self):
        print("__f called")
    @classmethod
    def _cf(cls):
        print("_cf called")
    @classmethod
    def __cf(cls):
        print("__cf called")

class _A:               # module class
    pass

class __A:              # module class
    pass
单下划线: 在所有地方都能访问 (相当于没有下划线, 但除了子类访问父类的所有单下划线开头的东西没有警告, 其它都会有警告), 除了不同文件的这种访问方法:
from myModule import *
print(_var)    # Error: _var is not defined
print(_A)      # Error: _A is not defined
_g()           # Error: _g is not defined
但这样是可以的:
import myModule
print(myModule._var)  # 输出: 5
print(myModule._A)    # 输出: <class 'myModule._A'>
myModule._g()         # 输出: _g called
这样可以:
from myModule import _var, _A, _g双下划线:
类中所有双下划线的 (
__ca,__ia,__f,__cf) 都只能在类的内部使用 (即 “private”, 子类和类外同文件都不行).- 其实是 Name Mangling, 比如
__ca在 runtime 会变成_A__ca(类名 + 变量名), 用这种方法可以访问 (在 Python 中没有什么是绝对 private 的!):
import myModule print(myModule.A._A__ca) # 输出: 2- 其实是 Name Mangling, 比如
类外的双下划线 (
__var,__g,__A) 必须用:import myModule from myModule import __var, __g, __A # 也可以这种方法导出其它文件.
Dunder Method 魔法方法
以双下划线开头和结尾的方法, 表示对某个类进行某种特定操作 (比如创建、销毁、加法、当作函数调用等) 时自动调用的方法 (如同 C++ 的运算符重载).
- 注意所有的魔法方法都是 Python 提供的, 自己不能定义!
dunder-method.py
def addone(x):
    return x + 1

class Book:
    def __init__(self, title, author, pages):
        self.title = title
        self.author = author
        self.pages = pages

    def __str__(self):  # 决定了当你使用 print() 或 str() 时的输出内容
        return f"The book is '{self.title}' by {self.author}"

    def __len__(self):  # 决定了当你使用 len() 时的返回值
        return self.pages

    def __eq__(self, other):    # 决定了当你使用 == 时的比较行为
        if isinstance(other, Book):
            return self.title == other.title and self.author == other.author
        return False

    def __call__(self): # 允许实例像函数一样被调用
        return f"Reading '{self.title}'..."

    def __addone__(self):   # 不能自定义魔法方法
        return self.pages + 1

# Example usage
book1 = Book("1984", "George Orwell", 328)
book2 = Book("1984", "George Orwell", 328)
book3 = Book("Brave New World", "Aldous Huxley", 288)
print(book1)                  # Output: The book is '1984' by George Orwell
print(len(book1))             # Output: 328
print(book1 == book2)         # Output: True
print(book1 == book3)         # Output: False
print(book1())                # Output: Reading '1984'...
print(addone(book1))          # Error!
- 其它 dunder method:
__dict__: 返回所有实例属性的字典, 比如:class Foo: def __init__(self): self.a = 1 def add_attr(self): self.b = 2 foo = Foo() print(foo.__dict__) # 输出: {'a': 1} foo.add_attr() print(foo.__dict__) # 输出: {'a': 1, 'b': 2}, 这里实例的属性多了一条!
子模块初始化
设
utils是一个可以import的库, 那在import utils时, Python 会自动执行utils/__init__.py里面的代码.myproj/ └── utils/ ├── __init__.py └── math_tools.py__init__.py中必须用相对导入:import tensor # ModuleNotFoundError: No module named 'tensor' from .tensor import * # Correct
Python 常用数据结构
Dictionary 字典
访问 key, value 和 key-value 对:
a = {'x': 1, 'y': 2, 'z': 3}
print(a.keys())        # 输出 dict_keys(['x', 'y', 'z'])
print(a.values())      # 输出 dict_values([1, 2, 3])
print(a.items())       # 输出 dict_items([('x', 1), ('y', 2), ('z', 3)])
注意返回的不是 list 而是视图对象 (原对象变化后可以跟着变):
a = {'x': 1, 'y': 2, 'z': 3}
keys_view = a.keys()
print(keys_view)       # 输出 dict_keys(['x', 'y', 'z'])
a['w'] = 4
print(keys_view)       # keys_view 也变了,
                       # 输出 dict_keys(['x', 'y', 'z', 'w'])
用
get()来访问 key, 返回对应的 value- 注意 key 不存在时不会报错, 而是返回
None!
a = {'x': 1, 'y': 2} print(a.get('x')) # 输出 1 print(a.get("x")) # 也可以 print(a.get('z')) # 输出 None- 注意 key 不存在时不会报错, 而是返回
可变参数
*: 表示任意数量的单个参数, 会自动打包成一个 tuple, 比如('a', 'b', 'c').- 一般约定叫
*args(arguments), 但也可以随便取名, 比如*courses.
- 一般约定叫
**: 表示任意数量的 “xxx=yyy” 形式的参数, 会自动打包成一个 dict, 比如{'hobby': '篮球', 'score': 95}.- 一般约定叫
**kwargs(keyword arguments), 但也可以随便取名, 比如**extras. - 会配合
for key, value in kwargs.items():解包使用!
- 一般约定叫
def student_info(name, age, *courses, **extras):
    """
    name: 必需参数
    age: 必需参数
    *courses: 可变数量的课程
    **extras: 可变数量的额外信息
    """
    print(f"姓名: {name}")
    print(f"年龄: {age}")
    print(f"课程: {courses}")
    print(f"额外信息: {extras}")

# 使用, 从第一个格式为 "xxx=yyy" 的参数开始算 extras
student_info("张三", 18, "数学", "物理", "化学", hobby="篮球", score=95)
# 可以没有 courses
student_info("李四", 20, hobby="音乐")
# "历史" 不是 "xxx=yyy" 结构, 报错!
# student_info("王五", 22, "英语", hobby="阅读", "历史")  # SyntaxError
First-class Objects
- 一个对象若有以下特征, 则称其为 “first-class object”:
- 可以被赋值给变量
- 可以作为参数传递给函数
- 可以作为函数的返回值
- 可以在运行时动态创建
- 可以存储在数据结构中 (如列表、字典等)
- Functions 函数
function-1stclass.py
# 1. 赋值给变量
def greet(name):
    return f"Hello, {name}!"

my_function = greet  # 函数赋值给变量
print(my_function("Alice"))  # 输出: Hello, Alice!

# 2. 作为参数传递
def shout(func, name):
    result = func(name)
    return result.upper()

print(shout(greet, "Bob"))  # 输出: HELLO, BOB!

# 3. 作为返回值, 这里也可以用装饰器!
def simple_decorator(func):
    def wrapper():
        print("函数执行前...")
        func()  # 调用原始函数
        print("函数执行后...")
    return wrapper

def say_hello():
    print("Hello!")

simple_decorator(say_hello)() # 输出:
                              # 函数执行前...
                              # Hello!
                              # 函数执行后...

# 4. 存储在数据结构中
operations = {
    'add': lambda x, y: x + y,
    'subtract': lambda x, y: x - y,
    'multiply': lambda x, y: x * y
}

print(operations['add'](10, 5))      # 输出: 15
print(operations['multiply'](3, 4))  # 输出: 12
- Classes 类
class-1stclass.py
# 1. 类可以赋值给变量
class Dog:
    def bark(self):
        return "Woof!"

Pet = Dog  # 类赋值给变量
my_dog = Pet()
print(my_dog.bark())  # 输出: Woof!

# 2. 类作为参数传递
def create_animal(cls, name):
    return cls(name)

class Cat:
    def __init__(self, name):
        self.name = name

    def meow(self):
        return f"{self.name} says Meow!"

cat = create_animal(Cat, "Whiskers")  # 传递类作为参数
print(cat.meow())  # 输出: Whiskers says Meow!
Python Decorator 装饰器
广义来说, 返回值和参数都是函数的函数都可以叫作装饰器 (C++ 叫 wrapper).
- 装饰器就想每当一个函数执行的时候多输出一些日志等信息但又不想将日志
print代码写在函数体内 (给函数穿衣服).- 比如 Listing lst-function-1stclasspy 中
simple_decorator()装饰器也可以写成:
- 比如 Listing lst-function-1stclasspy 中
decorator.py
def simple_decorator(func):
    def wrapper():
        print("函数执行前...")
        func()  # 调用原始函数
        print("函数执行后...")
    return wrapper

@simple_decorator
def say_hello():
    print("Hello!")

# 使用装饰器
say_hello() # Output:
            # 函数执行前...
            # Hello!
            # 函数执行后...
Python Iterator 迭代器
动机: 在 C 语言中没有迭代器这种东西, 如果要遍历数组和链表, 需要用两种完全不同的方法遍历, 非常不方便. 我们希望在 Python 中都能统一用
for i in entity这种方法来遍历, 引入了迭代器.Python 中引入了下面两个类 (注意区分!):
- Iterable 可迭代对象: 指这个对象有
__iter__()方法.可迭代对象能被
for遍历:a = [1, 2, 3] # List b = (1, 2, 3) # Tuple c = {1, 2, 3} # Set d = {'a': 1, 'b': 2, 'c': 3} # Dictionary e = "hello" # String f = range(5) # Range for item in a: print(item) # 1 2 3 for item in d: print(item, d[item]) # a 1 b 2 c 3 for item in f: print(item) # 0 1 2 3 4
- Iterator 迭代器: 指这个可迭代对象不仅有
__iter__()方法, 还有__next__()方法 (“迭代器协议”).由定义知: 迭代器一定是可迭代的.
上面这些对象都不是迭代器, 但是可通过
iter()函数转换为迭代器:a = [1, 2, 3] # print(a.__next__()) # a is not an iterator! a = iter(a) # convert a to iterator print(a.__next__()) # 1 print(a.__next__()) # 2 print(a.__next__()) # 3 # print(a.__next__()) # StopIteration Error天生就是迭代器的对象:
gen = (2*x for x in [1,2,3])        # generator
m = map(lambda x: 2*x, [1,2,3])     # map object

print(gen.__next__())   # 2
print(m.__next__())     # 2
可以给自己的类实现
__iter__()和__next__()方法使其成为一个迭代器. (也可用yield)
- Iterable 可迭代对象: 指这个对象有
for循环的本质 (左边等价于右边)
a = [1, 2, 3]

for i in a:
    print(i)
a = [1, 2, 3]
a_it = iter(a)
while True:
try:
x = a_it.__next__()
print(x)
except StopIteration:
breakPython Lambda 表达式
Lambda 表达式一般用于小的、没必要写成函数的计算. 一般与
for可以相互代替, 注意下面三者的区别:gen = (2*x for x in [1,2,3]) # generator, 是 iterator my_list = [2*x for x in [1,2,3]] # list, 仅仅是 iterable m = map(lambda x: 2*x, [1,2,3]) # map object, 是 iterator
链式调用
返回 *this 的引用可以实现链式调用:
chaining.cpp
#include <iostream>

class Point {
private:
    int x_ = 0; int y_ = 0;

public:
    Point& setX(int x) {
        x_ = x;
        return *this;
    }

    Point& setY(int y) {
        y_ = y;
        return *this;
    }
};

int main() {
    Point p;
    // Set values by chaining
    p.setX(10).setY(20);
}
cocotb 库
- 常用操作:
import cocotb
from cocotb.clock import Clock
from cocotb.triggers import RisingEdge
Pybind11
Pybind11 是一个 C++ 库, 使得我们可以在 Python 代码中调用 C++ 函数和类.
Python 调用 C++ 函数
add_op.cpp
#include <pybind11/pybind11.h>

int add(int a, int b) {
    return a + b;
}

/// @param ops library name
PYBIND11_MODULE(ops, m) {
    m.def("add", &add);
}
main.py
import ops

print(ops.add(3, 5))
- Listing lst-addopcpp 中第一个
add是 Python 里调用用的函数名, 第二个是 C++ 里的函数名.ops和m也可以换成任意别的名字. 运行类似下面的命令:
c++ -O3 -Wall -shared -std=c++11 -fPIC -undefined dynamic_lookup \
    -I/opt/homebrew/anaconda3/lib/python3.12/site-packages/pybind11/include \
    -I/opt/homebrew/anaconda3/include/python3.12 \
    add_op.cpp -o ops.cpython-312-darwin.so

python main.py # output 8
第一个命令会在当前目录下产生一个 .so (shared object) 文件. 运行 python main.py 的时候在 import ops 的时候, Python 会在 .so 文件中找到 add 函数.
Python 调用 C++ 类
ml_bind.cc
#include <pybind11/pybind11.h>

namespace ml {

class Model {
public:
    Model() = default;
    virtual ~Model() = default; // 虚析构函数以确保派生类正确析构

    virtual double forward(double x) const {
        return x;
    }
};

class LinearModel : public Model {
public:
    double weight;
    LinearModel(double w = 1.0) : weight(w) {}

    double forward(double x) const override {
        return weight * x;
    }
};

} // namespace ml

PYBIND11_MODULE(ml_ops, m) {
    pybind11::class_<ml::Model>(m, "Model")     // ml::Model 映射到 Python 里的 Model
        .def(pybind11::init<>())                // 绑定类的默认构造函数
        .def("forward", &ml::Model::forward);   // 绑定类的成员函数 `forward`.

    pybind11::class_<ml::LinearModel, ml::Model>(m, "LinearModel")
        .def(pybind11::init<double>(), pybind11::arg("weight") = 1.0)
        .def("forward", &ml::LinearModel::forward) // 绑定类的成员函数 `forward`.
        .def_readwrite("weight", &ml::LinearModel::weight);
}
- 上面的代码把 C++ 中的
Model类和其子类LinearModel绑定到 Python 中. 下面对未注释的代码进行解释:<>中表示告诉 Python 前者是要绑定的类, 后者是其父类; 并且在 Python 里这个类叫LinearModel(同名).pybind11::class_<ml::LinearModel, ml::Model>(m, "LinearModel")绑定类的构造函数: 这里表示
LinearModel的构造函数接受一个double类型的参数weight, 默认值是1.0..def(pybind11::init<double>(), pybind11::arg("weight") = 1.0)在 Python 里可以这样构造:
LinearModel()           # weight 默认为 1.0
LinearModel(2.5)        # weight 设为 2.5
LinearModel(weight=2.5) # 同上
绑定类的成员变量
weight:.def_readwrite("weight", &ml::LinearModel::weight);在 Python 里可以直接读写:
lm.weight
lm.weight = 5.0
为什么
Model要加下面的析构虚函数?virtual ~Model() = default;是因为下面 Python 会使用
std::shared_ptr创建对象Model, 并在代码在结束时销毁它, 如果没有虚析构函数, 可能会导致派生类LinearModel的析构函数不被调用 (不加会有 warning).
main.py
from ml_ops import Model, LinearModel

# 使用基类
model = Model()
print(model.forward(2.0))               # 2.0

# 使用派生类
linearModel = LinearModel(weight=3.0)
print(linearModel.forward(2.0))         # 6.0

# 验证继承关系
print(isinstance(linearModel, Model))   # True

# 访问 C++ 成员变量
print(linearModel.weight)               # 3.0
linearModel.weight = 5.0
print(linearModel.forward(2.0))         # 10.0
- 再写一个
setup.py来编译绑定代码:
setup.py
from setuptools import setup, Extension
import pybind11

ext_modules = [
    Extension(
        "ml_ops",
        ["ml_bind.cc"],
        include_dirs=[pybind11.get_include()],
        language="c++",
        extra_compile_args=["-std=c++17"],
    ),
]

setup(
    name="ml_ops",
    ext_modules=ext_modules,
)
运行:
# Generate something like ml_ops.cpython-39-darwin.so
python setup.py build_ext --inplace
python main.py
运行结果:
2.0
6.0
True
3.0
10.0
Build Tools 构建工具
CMakeLists
一般工作流与设计哲学
下面以这个工程模版为演示:
demo-proj/
├── build/                      # 所在目录绝对路径成为 CMAKE_BINARY_DIR 的值
│   ├── CMakeFiles/...
│   ├── math/...
│   ├── Makefile
│   └── ...
├── install/
│   ├── bin/
│   │   └── myapp               # 可执行文件
│   ├── include/                # 给使用者的头文件
│   │   ├── add.h
│   │   └── utils.h
│   └── lib/                    # 动态链接库 (myapp 必须要这些文件才能运行!)
│       ├── libmathlib.dylib
│       └── libutilslib.dylib
├── math/
│   ├── add.cc
│   ├── add.h
│   ├── utils.cc
│   ├── utils.h
│   └── CMakeLists.txt
├── main.cc
└── CMakeLists.txt              # 所在文件绝对路径成为 CMAKE_SOURCE_DIR 的值
Out-of-source build 与 In-source build:
上面的工程采用的是 Out-of-source build, 即把编译生成的文件都放在
install/目录下, 源代码和编译生成的文件分开存放.如果是 In-source build, 则会把编译生成的文件和源代码文件混在一起, 不推荐:
demo-proj/
├── main.cpp
├── Makefile
└── myapp
工作流:
rm -rf build && mkdir build cd build cmake .. # 配置阶段 make # 构建阶段 cd .. && cmake --install build --prefix install # 安装阶段: 生成 install/ 目录, 没有 prefix 则默认安装到 /usr/local/ (要 sudo)- 配置阶段:
- 一般会在
build/目录下运行:cmake ..而不是在 CMAKE_SOURCE_DIR 目录下运行cmake .! - 仅配置阶段生效的命令要格外注意! 配置完了改变文件不重新
cmake ..的话是不会生效的!
- 一般会在
- 构建阶段
- 安装阶段
- 配置阶段:
CMake built-in variables 内置变量: 不能看作普通的变量! CMake 中会自动利用和管理这些变量, 比如
CMAKE_MODULE_PATH这个宏能告诉 CMake 去哪里找文件.CMAKE_SOURCE_DIR: 顶层CMakeLists.txt所在目录, 比如demo-proj/.CMAKE_BINARY_DIR:cmake ..命令运行的根目录, 一般是demo-proj/build/.CMAKE_CURRENT_SOURCE_DIR: 当前CMakeLists.txt所在目录, 可以是顶层也可以是非顶层 (比如demo-proj/math/).CMAKE_CURRENT_BINARY_DIR: 当前CMakeLists.txt镜像到的 build 目录 (比如demo-proj/build/math/).
CMakeLists 作为计算机语言
下面的命令都写在
CMakeLists.txt里面, 并用:cmake -P CMakeLists.txt运行.
String 字符串: CMake 中的唯一类型!
基本操作:
# 赋值, 只有 string!
set(A 123)          # A = "123"
set(MY_LIST a b c)  # MY_LIST = "a;b;c", 还是字符串, 只不过自动用分号隔开了.
                    # 不等价于 set(MY_LIST "abc"), 等价于 set(MY_LIST "a;b;c")
# 打印
message(A)          # 输出: A (没有自动解引用! 同 message("A"))
message(${A})       # 输出: 123
message(STATUS ${MY_LIST})  # 输出: -- abc (STATUS 表示这是状态信息, 会有 -- 前缀, 可选项还有 WARNING, ERROR)
message("${MY_LIST}")       # 输出: a;b;c (用引号防止分号被忽略! 一般都用这种)

# 字符串操作:
# 追加字符
list(APPEND A 4)
list(APPEND MY_LIST de)
message(${A})         # 输出: 1234
message("${MY_LIST}") # 输出: a;b;c;de
# 过滤字符
set(MY_SRCS main.c utils.c main_test.c utils_test.c)
list(FILTER MY_SRCS EXCLUDE REGEX "_test\\.c$")  # 过滤掉所有以 _test.c 结尾的文件
message("${MY_SRCS}")  # 输出: main.c;utils.c
# 替换字符
string(REPLACE ".c" ".o" MY_OBJS "${MY_SRCS}")
message("${MY_OBJS}")  # 输出: main.o;utils.o
MACRO
# MACRO (纯文本展开!)
macro(my_macro x y)
    message("x=${x}, y=${y}")
    set(X 100)
endmacro()

set(X 1)
message(${X})       # 输出: 1
my_macro(10 20)     # 输出: x=10, y=20
message(${X})       # 输出: 100
FUNCTION
# FUNCTION function(f a b) # f: 函数名. a,b: 形参 message("a=${a}, b=${b}") message(${ARGC}) # 参数个数, 是全局变量! message(${ARGV}) # 所有参数列表, 是全局变量! message(${ARGV0}) # 第0个参数, 是全局变量! 同理有 ARGV1, etc. message(${ARGN}) # 额外参数列表, 是全局变量! set(X 200) endfunction() set(X 2) f(q ww e r t) # 输出: a=q, b=ww # 5 # qwwert # q # ert message(${X}) # 输出: 2 (函数内修改不影响外部变量)cmake_parse_arguments(): 解析命令行参数function(test_parse) # test_parse 函数名, 暂时不写参数 # 1. 定义三类参数名, 这三种参数要严格遵循下面的顺序: set(aa AA) # bool param set(bb BB) # single value param set(cc CC1 CC2) # multi values param # 2. 解析参数 cmake_parse_arguments(MYPREFIX # 表示在所有的宏变量前加 MYPREFIX_ 前缀 "${aa}" # 匹配 AA "${bb}" # 匹配 BB "${cc}" # 匹配 CC1 CC2 CC3 ${ARGN} # 匹配未匹配的参数 ) # 如果要忽略某个参数比如 bb, 一定要用 "" 代替而不能忽略: # cmake_parse_arguments(MYPREFIX "${aa}" "" "${cc}" ${ARGN}) # 3. 打印结果 message("${MYPREFIX_UNPARSED_ARGUMENTS}") # 这个宏由 CMake 定义, 名字是固定的 message("AA = ${MYPREFIX_AA}") message("BB = ${MYPREFIX_BB}") message("CC1 = ${MYPREFIX_CC1}") message("CC2 = ${MYPREFIX_CC2}") endfunction() # 4. 调用函数 test_parse( test1 test2 # test1 和 test2 会在未匹配参数中 AA test3 # test3 会在未匹配参数中 BB main.cpp test4 # test4 也会在未匹配参数中 CC1 inc include CC2 src test5 # test5 会在 CC2 中! )输出:
test1;test2;test3;test4
AA = TRUE
BB = main.cpp
CC1 = inc;include
CC2 = src;test5
引入 Macro/Function
include(cmake/utils.cmake)
# 可以使用 cmake/utils.cmake 里面定义的 Macro/Function
告诉 CMake 去哪里找文件: 通过增加
CMAKE_MODULE_PATH这个宏.list(APPEND CMAKE_MODULE_PATH "${CMAKE_CURRENT_SOURCE_DIR}/cmake") include(utils) # 不是 utils.cmake! # 可以使用 cmake/utils.cmake 里面定义的 Macro/Function
分支
# 分支
set(MY_FLAG ON)         # 相当于 True, ON 也可以换成: 1, YES, TRUE, Y
if(MY_FLAG)
    message("true")     # 输出: true
else()
    message("false")    # 不会执行
endif()
在
if()括号里面的还有很多常见判断 (遇到了知道什么意思就行), 比如:if(3 GREATER 2) # 比较运算: GREATER, LESS, EQUAL, etc. if(DEFINED VAR) # 变量是否定义 if(EXISTS "${CMAKE_SOURCE_DIR}/test.cc") # CMAKE_SOURCE_DIR 是 CMakeLists.txt 所在目录
CMake Built-in Commands
命令的参数顺序: 子命令 + 输入/变量 + 输入/变量. 以
file()为例:file(GLOB MY_CSRCS *.c) # GLOB (Global pattern matching): 子命令 # MY_CSRCS: 定义了一个变量 # *.c: 表示收集所有的 .c 文件file(): 文件操作file(READ version.txt VERSION) # 读取 version.txt 并定义到变量 VERSION file(WRITE output.txt "Hello World") # 写入文件 file(STRINGS params.json CONTENT) # 将 params.json 的内容读到 CONTENT 变量 (每行之间的换行符会被替换为分号) file(COPY) file(MAKE_DIRECTORY ${CMAKE_BINARY_DIR}/output) # 创建目录 file(REMOVE temp.txt) # 删除文件 file(GLOB MY_CSRCS *.c *.cpp *.cc) # 收集当前目录所有符合模式的文件名到变量 MY_CSRCS file(GLOB_RECURSE MY_SRCS src/*.c) # src/ 的子目录中的 .c 也算 (仅配置阶段生效, 不建议使用) file(RELATIVE_PATH MY_REL_PATH /a/b/c /a/b/e/f.json) # MY_REL_PATH = ../e/f.json模版文件:
configure_file()读入一个模版文件x.in, 用当前 CMakeLists 中有的变量替换x.in中的变量然后输出到指定文件, 比如用以下工程结构:. ├── CMakeLists.txt ├── hello.cc.in └── hello.cc /* 也可以不创建, 自动生成 */{.cpp filename="hello.cc.in" @lst-helloccin} #include <iostream> int main() { std::cout << "Hello, ${NAME}!" << std::endl; return 0; }```{.cmake filename=“CMakeLists.txt” Listing lst-cmakelists} # 定义一个变量 set(NAME World)
# 用模板生成真实文件 configure_file( hello.cc.in # 输入模板 hello.cc # 输出文件 ) ```
运行后:
{.cpp filename="hello.cc" @lst-hellocc} #include <iostream> int main() { std::cout << "Hello, World!" << std::endl; return 0; }
模版工程 Listing lst-demoproj 中的文件细节:
demo-proj/main.cc
#include "add.h"
#include <iostream>

int main() {
    std::cout << add(2, 3) << std::endl;
}
demo-proj/CMakeLists.txt
cmake_minimum_required(VERSION 3.16)
project(DemoInstall LANGUAGES CXX)

# 声明可能会使用子模块 math/CMakeLists.txt 中的所有 targets (mathlib 和 utilslib) 并跳到里面去执行!
add_subdirectory(math)

# 定义可执行的 target 名称: myapp
add_executable(myapp main.cc)

# 手动设置 RPATH, 让可执行文件能找到动态库
set_target_properties(myapp PROPERTIES
    INSTALL_RPATH "@executable_path/../lib"
    BUILD_WITH_INSTALL_RPATH TRUE
)

# 声明 myapp target 依赖 mathlib target
# PRIVATE 的意思是 mathlib 仅为 myapp 服务, 不会暴露给 myapp 的使用者
# 如果是 PUBLIC 则表示 mathlib 也会暴露给 myapp 的使用者
# 如果是 INTERFACE 则表示 mathlib 只暴露给 myapp 的使用者, 而 myapp 自身不需要 mathlib
# 虽然 utilslib 也被引入了, 但这里没有使用
target_link_libraries(myapp PRIVATE mathlib)

# 将生成的可执行文件 myapp 放到 install/bin/ 目录下
install(TARGETS myapp RUNTIME DESTINATION bin)  # RUNTIME 表示可执行文件
demo-proj/math/add.cc
#include "add.h"

int add(int a, int b) {
    return a + b;
}
demo-proj/math/add.h
#pragma once
int add(int a, int b);
demo-proj/math/utils.cc
#include <iostream>

void printMessage() {
    std::cout << "Print from utils" << std::endl;
}
demo-proj/math/utils.h
#pragma once
void printMessage();
demo-proj/math/CMakeLists.txt
# 定义两个 target: mathlib 和 utilslib 库, 并使用动态链接
add_library(mathlib SHARED add.cc)
add_library(utilslib SHARED utils.cc)

# 头文件搜索路径
target_include_directories(mathlib PUBLIC ${CMAKE_CURRENT_SOURCE_DIR})      # 当前目录下的文件会自动暴露给 mathlib 的使用者 (main.cc)
target_include_directories(utilslib PRIVATE ${CMAKE_CURRENT_SOURCE_DIR})    # 仅当前目录下的文件不会暴露给 utilslib 的使用者

# 设置一些 target 行为 (示例)
set_target_properties(mathlib PROPERTIES
    CXX_STANDARD 17
    POSITION_INDEPENDENT_CODE ON
)

# 安装规则:安装库本身 (可选, 这里主要示范)
install(TARGETS mathlib
    LIBRARY DESTINATION lib     # LIBRARY 表示 SHARED 动态库 (.dylib) 的安装路径
    ARCHIVE DESTINATION lib     # ARCHIVE 表示 STATIC 静态库 (.a) 的安装路径 (该文件可忽略)
)
install(TARGETS utilslib
    LIBRARY DESTINATION lib
    ARCHIVE DESTINATION lib
)

# 复制一份头文件, 这样基于 demo-proj 的项目可以用 include 引用这些头文件. (但别安装源文件)
install(FILES add.h utils.h DESTINATION include)
Makefile
格式:
target: prerequisites
    recipe
缺省规则
.DEFAULT_GOAL := all
all: ...
伪规则
.PHONY: all cleanAppend:
CFLAGS += -Wall -O2改后缀名:
SRCS_ASM = start.S
OBJS = $(SRCS_ASM:.S=.o)
冒号前面和后面:
%.o : %.c $(CC) $(CFLAGS) -c $< -o $@%为通配符, 意思是每当你需要一个.o文件, 并且当前目录下有对应的.c文件时, 就用下面的命令来生成它$<: 第一个依赖文件$@: 目标文件$^: 所有依赖文件$?: 所有比目标文件新的依赖文件
在 Makefile 里面调用
make: 建议用$(MAKE)(不需要定义直接有).
Bazel
Advantages
- 安装依赖方便
- Bazel 有很多第三方库. 比如硬件开发要用的
verilator, 引用库后bazel build会自动下载这个工具链的可执行文件到当前目录下的比如./bazel-bin/external/verilator位置! 极其方便!
- Bazel 有很多第三方库. 比如硬件开发要用的
基本概念与设计哲学
- Rule 规则:
Usage
- 规则复用:
rules/下面放很多类似 Python 语言的.bzl规则函数库, 定义了如何从指定的输入生成目标文件, 可以在BUILD文件中引用 (load()) 这些函数, 然后调用它们.用比如
load("@rules_hdl//verilator:defs.bzl", "verilator_cc_library")来引用第三方规则库 (rules_hdl github 仓库位置需要先声明).genrule: 如果要在BUILD里面直接用命令行生成文件 (而不是引用rules/中的规则), 可以用genrule:genrule( name = "generate_file", srcs = ["input.txt"], outs = ["output.txt"], cmd = "cp $(SRCS) $(OUTS)", )
Project Management 项目管理
Python
Virtual Environments
- Dependencies 依赖
Coding Habits
下面是一些常见的编程习惯和技巧, 注意反过来的脑回路: 读到类似的这些代码的时候也要立即条件反射出来他们在干什么!
General
- 能引用尽量引用不要用指针!
- 函数的参数尽量少.
- 写程序的时候先关注主逻辑, 函数的实现放到最后写.
C++中namespace中的内容不要缩进.
检查相等
- 浮点数不能直接用
==检查相等!- CPU 上一般用
std::numeric_limits<float>::epsilon()作为误差. - CPU 和 GPU 运算结果比较时一般用绝对误差比如
1e-8f(库函数提供的可能会太严格).
- CPU 上一般用
is_equal_float.cc
#include <iostream>

bool is_equal_float(
    const float *a,
    const float *b
) {
    const float eps_f = std::numeric_limits<float>::epsilon();
    // const float eps_f = 1e-8f; // 比较 CPU 和 GPU 的计算结果.
    float diff = std::fabs(*a - *b);
    if (diff > eps_f) {
        std::cout << "Not Equal" << std::endl;
        return false;
    } else {
        std::cout << "Equal" << std::endl;
        return true;
    }
}

int main() {
    float a = 0.1f + 0.3f;
    float b = 0.4f;
    is_equal_float(&a, &b);
}
正负无穷
涉及最小/最大值初始化. 例如我们要找
arr中的最大值:#include <float.h> // for FLT_MAX int main() { float arr[] = {3.2, -1.5, 7.8, 0.0, 4.4}; int n = sizeof(arr) / sizeof(arr[0]); float max_val = -FLT_MAX; // Initialize to -inf for (int i = 0; i < n; i++) { if (arr[i] > max_val) max_val = arr[i]; } std::cout << "Max value: " << max_val << std::endl; return 0; }
向上取整
向上取整的操作非常常见, 比如 HPC 里面分配多少个 block 等. 可通过 \[\left\lceil \frac{x}{y} \right\rceil = \left\lfloor \frac{x + y - 1}{y} \right\rfloor\] 实现 (由于整数除法默认向下取整):
int ceil_div(const int x, const int y) {
    return (x + y - 1) / y; // Automatically does floor division
}
遍历数组和张量
看见下面的代码时要立刻意识到这不仅是一个循环, 而且是一个遍历!!!
for (int i = 0; i < N; i++) { for (int j = 0; j < M; j++) { // Process element at (i, j) } } // for (int i = 1; i <= N; i++) {} // 不推荐for循环的边界: 从0开始计数而不是1, 用<而不是<=, 因为下标往往是从0开始的 (Matlab 除外), 如果用从1开始, 循环体里面还要减1, 很麻烦.- TODO: 如何思考高阶张量的处理? 不要用 global 的 mental picture?
全局索引与局部索引的转换
- 遇到下面这种形式的代码时, 要瞬间意识到这是在进行二维数组的 flatten/unflatten 操作!
Flattening:
lsu_index = i * THREADS_PER_BLOCK + j;int idx = blockIdx.x * blockDim.x + threadIdx.x;Unflattening:
int block_id = idx / block_dim;
int thread_id = idx % block_dim;
命名习惯
k: 用于常量变量 (constant variable), 例如const int kBufferSize = 1024;.foo(), bar(): 表示程序员不想起名字2 (就像 Alice 和 Bob).
2 来源于 FUBAR (Fucked up beyond all recognition).
- 功能相似的函数和文件用前缀匹配: 比如用
add_float(),add_float_vec(),add_int()而不是:float_add(),vec_float_add(),int_add(). 因为如果它们作为文件名的话, 前缀 match 的文件会放在一起, 方便查找!
getters 和 Setters
- 为了让外部代码访问和修改类的成员变量, 一种办法是将成员变量声明为
public, 但一旦外部代码写入了不合法的值, 就会导致类的状态变得不可预测. 因此我们用private+ getter/setter 的方式来控制对成员变量的访问和修改.
account_public.cpp
class Account {
public:
    double balance;
};

int main() {
    Account acc;
    acc.balance = -999999; // Not recommended
}
account_private.cpp
class Account {
private:
    double balance;

public:
    // const: no modification to member variables
    double getBalance() const { return balance; }

    void deposit(double amount) {
        if (amount > 0)
            balance += amount;
    }
};
常写 const
能加上
const尽量加上 (比如 Listing lst-account_private), 比如函数声明时的参数列表、返回值和函数体, 这样尤其是参数有指针的函数可以一眼看出来哪些是可读、可写的.const用法:const int *p1; // p1 本身可以修改, 但指向的内容不可以修改 int * const p2; // p2 本身不可以修改, 但指向的内容可以修改 const int * const p3; // 都不能修改 int const& my_int; // 引用的内容不可以修改, 同 const int& // int &const // 不合法Pytorch C++ API中提供TORCH_ARG宏, 用于自动生成类成员变量的 getter 和 setter 方法:#include <torch/torch.h> TORCH_ARG(double, balance) = 0;自动展开为:
private:
    double balance_ = 0;

public:
    // getter
    const double& balance() const { return balance_; }

    // setter
    double& balance() { return balance_; }
这种写法类似 Listing lst-account_private,
const double&意思是返回一个不可修改的引用 (若用值拷贝的话速度较慢). 第二个const表示 getter 方法本身不会修改这个类的所有成员变量 (balance_in this case). 用户可以通过obj.balance()来获取余额, 也可以通过obj.balance() = 100.0;来修改余额.const和constexpr区别:constexpr变量在编译时就算出来了, 且不可修改. 一般用于性能优化或用作编译时才能决定声明的数组大小.const int x = some_runtime_function(); // 合法 constexpr int y = some_runtime_function(); // 不合法, 因为 some_runtime_function() 不是常量表达式 constexpr int kTensorSize = 256 * 1024; // 合法 uint8_t tensor[kTensorSize]; // 编译时决定的数组大小
Code Reading & Techniques
本人看代码的速度极慢, 为了优化这一点, 我打算建立本章来积累一些阅读代码的经验和技巧, 主要是消除阅读代码时的心理负担. 本章也与 Coding Habits 有很多的重合之处, 以后可能会把两章合并 (TODO).
First Encounter
心理建设:
- Take it Easy: 一个
C++project 不过是一堆 class 和一个 main. - 大段代码其实逻辑不会很复杂, 要关注有没有类型检查、边界检查等等冗余代码. 还有
if else语句只有一个会被执行, 另一半都是没用的.
- Take it Easy: 一个
如果是 OOP, 关注类会改变哪些外部变量 (通常是引用传递) 而不是某个方法的具体实现.
先阅读接口函数 (一般会在
.h文件中!). 如果直接看.cc文件, 会看到一些接口实现调用的函数, 而且这些函数会放在接口函数上面, 这样丢掉了重点.关注参数列表的
const, 这意味着这些是只读的不会改变!读懂参数的含义是一件费时的事情, 但很多时候费时的地方在弄懂信息的存储格式. 比如你看到:
void DepthwiseConvPerChannel(const DepthwiseParam& params,
                             const int32_t* output_multiplier,
                             const int32_t* output_shift,
                             const RuntimeShape& in_shape,
                             ...)
就会很想知道
params,output_multiplier等里面到底是怎样的结构. 但请克制自己不要知道, 或者自己随便构思一个结构让自己相信它是对的! 因为这些数据结构的实现非常 ad hoc 而且不重要.不要一行一行读代码, 要功能性地读代码. 比如:
void relu_f32 (torch::Tensor input, torch::Tensor output) {
    if (x.options().dtype() != torch::kFloat32) {
        std::cout << "Tensor info: " << x.options() << std::endl;
        throw std::runtime_error("Input tensor must be torch::kFloat32");
    }
    if (y.options().dtype() != torch::kFloat32) {
        std::cout << "Tensor info: " << y.options() << std::endl;
        throw std::runtime_error("Output tensor must be torch::kFloat32");
    }
    ...
}
这个代码是在检查数据类型, 当你知道这一点时就别在纠结
options()是什么了.当一个
cpp文件有多个函数定义时, 一般最下面的函数才是对外暴露的接口 (因为它调用了上面的函数), 先看最下面的函数.如果有很多个名字差不多的函数, 最短的那个将是对其它的封装, 比如:
void _relu_f32_kernel(...) { ... }
__global__ void relu_f32_kernel(...) { ... }
void relu_f32_util(...) { ... }
void relu_f32(...) { ... } // True API
单从名字上来看,
_relu_f32_kernel()仅给relu_f32_kernel()使用 (因为有下划线而且重名); 而relu_f32封装了relu_f32_kernel和relu_f32_util(因为名字 match 前缀且更短).对象作为元数据: 比如
torch::Tensor这个对象里并不是 tensor 数据本身, 而是:Tensor ├─ sizes ├─ strides ├─ dtype ├─ device └─ data_ptr ---> 实际数据的指针- 所以你会看到很多
tensor.data_ptr()这样看上去取了两次数据的感觉, 其实第一层的tensor只是元数据, 第二层才是实际数据.
- 所以你会看到很多
RTL 代码阅读
下面的 Verilog 代码片段说明这个模块有两个功能, 功能的启用由
<func>_enable决定; 每个功能是一个 3 个状态的 FSM.if (xxx_enable) begin case (state) A: begin ... lsu_state <= B; end B: begin ... lsu_state <= C; end C: begin ... lsu_state <= A; end endcase end if (yyy_enable) begin case (state) A: begin ... lsu_state <= B; end B: begin ... lsu_state <= C; end C: begin ... lsu_state <= A; end endcase end- 如果
...的部分没有什么 operation, 只有将输入赋值给输出的操作, 那么这个模块其实就是一个有条件的连接器而已!! 如果有 splitter 之类的就有 decoder 的功能.
- 如果
Verilog
Change of Mind: Hardware does not “execute” the lines of code in sequence.
下文不严格区分 Verilog 和 SystemVerilog (你可以当作都是 SystemVerilog).
Verilog Basics
assign- 多个
assign执行没有顺序, 同时进行. assign是 “continuous assignment”, 右值变化时, 左值跟着变化.
- 多个
Operation 运算符:
~,!(logical),&,&&(logical),|,||(logical),^(XOR).if, else if是有顺序的!!!(procedure 一定要放在 always 块中吗?)
(为什么 wire 类型不能在 always 里面被赋值?)
always块中的代码是顺序执行的 (但在always块外的代码是并行执行的).module top (input my_in, output reg my_out); always @(*) begin my_out = 0; my_out = 1; // This is valid! (Always block 按顺序执行) end endmoduleLatch 推断: 下面如果
cpu_overheated = 0则默认会让shut_off_computer保持上一个值, 这就是 latch 推断.always @(*) begin if (cpu_overheated) shut_off_computer = 1; end有时我们就是需要这种推断, 但为了避免, 可以利用always 的顺序性先提前赋值:
always @(*) begin
    shut_off_computer = 0; // 先提前赋值
    if (cpu_overheated)
        shut_off_computer = 1;
end
input a默认为wire.begin end在只有一行代码时可以省略 (相当于 C 中的{}).wire不能在always块中被赋值.reg才能在always中被赋值.wire a; always @(*) begin assign a = 1; // Error! endwire a; always @(*) begin a <= 1; // Not an error, `a` is viewed as a reg. endSynchronous and Asynchronous Reset:
synchronous reset:
always @(posedge clk) begin
    if (reset)
        ...
end
asynchronous reset:
always @(posedge clk or posedge reset) begin
    if (reset)
        ...
end
or只能在always块中使用,if ()中要用||.Inference 和 Instantiation:
Inference: 通过
always块的内容推断出一个模块的功能.Instantiation: 显式地实例化一个模块, 通过
module_name instance_name (port_map)的方式:fetcher #( .PROGRAM_MEM_ADDR_BITS(PROGRAM_MEM_ADDR_BITS), .PROGRAM_MEM_DATA_BITS(PROGRAM_MEM_DATA_BITS) ) fetcher_instance ( .clk(clk), .reset(reset), .core_state(core_state), .current_pc(current_pc), ... );- 注意
port_map左侧是模块内的端口名, 右侧是当前作用域内的信号名 (不一定要一样). #(...)是systemverilog的语法, 用来传递参数. 同样, 右侧是当前作用域内的参数名.- 所以也可以写成:
.PROGRAM_MEM_ADDR_BITS(8).
- 所以也可以写成:
- 注意
循环群结构 (Torus, etc) 如果用
%运算符来处理会消耗大量资源, 尽量用if语句:if (mm == 8'd59) begin mm <= 8'd0; end- 如果用
%运算符来处理:-1 % 16的结果是-1, 而不是15(所以(a-1)%16应该写成(a+15)%16).- 1~12 的循环先转换为 0~11 的循环, 再换元.
- 如果用
BCD (Binary-Coded Decimal): 一种从 0 到 9 的计数器, 输出是四位二进制编码的十进制数.
Blocking 和 Non-blocking assignments:
=: Blocking assignment, 若在always块中使用, 则必须按照顺序执行!<=: Non-blocking assignment, 在always块中使用时, 会同时执行所有赋值. (一般always里面都用这个!)
Verilog 向量
一个易错点
reg [7:0] foo;      // foo[i] 是 1 bit
reg [7:0] foo[3:0]; // foo[i] 是 8 bit
1 维数组转换为 2 维数组 (索引段选择):
genvar i;
generate
    for (i=0; i<4; i=i+1) begin : gen_regs
        data_2d[i] = data_1d[8*i +: 8]; // 8*i 为起始, 8 为宽度
    end
endgenerate
index 可以是负数:
reg [5:-1] my_reg; // index 可以是负数. wire [0:3] my_wire; // Big-endian, mywire[0] is MSB, use my_wire[3:0] later is illegal!Concatenation:
assign out = {tmp, {3{3'b100}}}; // Concatenation, out = 0000011 100 100 100
硬件代码生成
generate for块: 用于生成重复的硬件结构 (只是偷懒, 不用写重复的相似代码). (下文两个代码块是等价的, 其中gen_regs只是一个 label, 可以随便取名)
genvar i; // 只用于生成硬件结构的循环变量
generate
    for (i = 0; i < 4; i = i + 1) begin : gen_regs
        always @(posedge clk) begin
            q[i] <= d[i];
        end
    end
endgenerate
always @(posedge clk) q[0] <= d[0];
always @(posedge clk) q[1] <= d[1];
always @(posedge clk) q[2] <= d[2];
always @(posedge clk) q[3] <= d[3];generate if块: 用于根据参数生成不同的硬件结构.
module reg1 #(
    parameter bit USE_RESET = 1
)(
    input  logic clk,
    input  logic rstn,
    input  logic d,
    output logic q
);
generate
    if (USE_RESET) begin
        always @(posedge clk or negedge rstn) begin
            if (!rstn)
                q <= 1'b0;
            else
                q <= d;
        end
    end else begin
        always @(posedge clk) begin
            q <= d;
        end
    end
endgenerate
endmodule
module reg1 (
input logic clk,
input logic rstn,
input logic d,
output logic q
);
always @(posedge clk or negedge rstn) begin
if (!rstn)
q <= 1'b0;
else
q <= d;
end
endmoduleSystemverilog 函数
$clog_2: 向上取整的 \(\log_2(\cdot)\), 比如:input wire [$clog2(THREADS_PER_BLOCK):0] thread_count
Verilog Testbench
`timescale 1ns / 1ps // #1 代表 1ns, 最精确可以到 #1.001
`timescale 1ns / 1ns // #1 代表 1ns, #1.01 等是不合法的

$stop //停下来
Chisel
基本操作
连线
:=将右边的信号驱动到左边 (注意是单向的!)允许多个
:=赋值到同一个输出:io.out := 0.U io.out := 1.U // 覆盖上一个
<>只能对Bundle类型的信号进行连接,+&: 如果io.in_a和io.in_b为4.W时, 则sum为5.W(带溢出).val sum = io.in_a +& io.in_bif和when的区别:if用来在编译阶段决定电路是哪一种when用来生成固定的 verilog 电路, 相当于 verilog 的if.
orR: reduction OR, 对所有位进行 OR 操作. 比如 GPR 读寄存器时, 只要地址不是全 0,就读出寄存器的值 (即创建了一个虚拟的 x0 寄存器,值恒为 0):io.rdata1 := Mux(io.raddr1.orR, regs(io.raddr1), 0.U) io.rdata2 := Mux(io.raddr2.orR, regs(io.raddr2), 0.U)
Area Optimization 面积优化方法
有时可读性强的代码会导致使用的逻辑门更多, 占用更多面积. 所以一个模块有时会写两种版本, 一种是可读性强的, 另一种是面积优化的版本.
CSE 公共子表达式消除
Common Subexpression Elimination 也是编译器优化的一种. 举个简单的例子:
int x = a + b;
int y = a + b;
可以优化为:
int temp = a + b;
int x = temp;
int y = temp;
这样就避免了重复计算 a + b 两次.
在 RTL 设计中, 比如 Listing lst-AddSubSimple 这个简单的加减法模块, 注意到 “减法” 其实等价于 “加上 B 的补码”, 可以得到更优化的版本 Listing lst-AddSubArea:
AddSubSimple.scala
class AddSubSimple extends Module {
  val io = IO(new Bundle {
    val a = Input(UInt(8.W))
    val b = Input(UInt(8.W))
    val sub = Input(Bool())   // true 表示减法
    val out = Output(UInt(8.W))
  })

  // 两个独立运算单元
  val addRes = io.a + io.b
  val subRes = io.a - io.b

  io.out := Mux(io.sub, subRes, addRes)
}
AddSubArea.scala
class AddSubOptimized extends Module {
  val io = IO(new Bundle {
    val a = Input(UInt(8.W))
    val b = Input(UInt(8.W))
    val sub = Input(Bool())
    val out = Output(UInt(8.W))
  })

  // 如果是减法,就取 -B;否则取 B
  val b_eff = Mux(io.sub, -io.b, io.b)
  io.out := io.a + b_eff
}
对比他们两个 sbt 出来的 verilog 代码:
AddSubSimple.v
module AddSubSimple(
  input        clock,
  input        reset,
  input  [7:0] io_a,
  input  [7:0] io_b,
  input        io_sub,
  output [7:0] io_out
);
  wire [7:0] addRes = io_a + io_b;
  wire [7:0] subRes = io_a - io_b;
  assign io_out = io_sub ? subRes : addRes;
endmodule
AddSubArea.v
module AddSubArea(
  input        clock,
  input        reset,
  input  [7:0] io_a,
  input  [7:0] io_b,
  input        io_sub,
  output [7:0] io_out
);
  wire [7:0] _b_eff_T_1 = 8'h0 - io_b;
  wire [7:0] b_eff = io_sub ? _b_eff_T_1 : io_b;
  assign io_out = io_a + b_eff;
endmodule